Creating a Twitter account allows users to experience a new dimension of fun and content. However, their experience on the platform depends entirely on their customized adjustments. There are several Twitter settings to serve this purpose. Tweaking a few buttons will eventually give every user their desired account.
Many Tweeps use the Twitter space to promote their brand and content. Some other ones go to the platform to engage with content they like. Whichever way, every feed and engagement depends on individual adjustments. Therefore, it is essential to manage your Twitter settings to your preference. That said, this article gives a detailed explanation of various adjustments you can make to your account.

Table of Contents
How To Make Major Settings on Twitter: Various Adjustments To Customize Your Account
While your Twitter account runs smoothly after its creation, there are details you must adjust for more experience. The platform provides several options to manage your account. It makes it possible to create the perfect profile and attract the right audience. At the same time, you get to adjust your language and display to your preference.
How To Adjust Profile Settings on Twitter
The first step after creating a Twitter account is to edit your profile. This would help your identity on the platform. At the same time, it would create an impression on your current followers and influence your future followers. Therefore, managing your profile settings on Twitter is essential for your social media profile.
This is achievable in seven steps:
- Log into your Twitter account on a mobile phone or desktop web browser.
- Tap the “Me” option for mobile users to view your profile. The profile icon on a desktop web browser is above your username on the left.
- Next, select the “Edit Profile” option beside your profile picture. The profile settings will appear on the next page.
- Select one of the multiple options to upload a new profile picture and add the perfect bio to get adequate exposure.
- Select other options to edit your date of birth, website, and location.
- Select the option to switch to a professional account if you want.
- Tap or click on save to effect the adjustments on your profile.
Saving these changes completes your profile. Other users can now see your profile, and you can also send follow requests to them. It would help to know how to write the perfect bio to get better engagement and followers. Now that you have edited your profile, you must adjust other features to get the perfect account.
How To Adjust Notifications Settings on Twitter
Twitter notifications are a way to alert users about new updates on their accounts. Registering your email address to your account also makes you receive email notifications. You receive email notifications about everything happening on your account when you are offline. These notifications include mentions, follows, and updates.
Fortunately, you can adjust notification settings on Twitter. This adjustment allows you to turn off notifications and filter them.
You can do this in six simple steps:
- On a desktop web browser, click on the More option on the left side of the homepage. For mobile users, tap on the profile picture in the left-hand corner.
- Click or tap on the arrow beside “Settings and Support” to view a drop-down menu.
- Select “Settings and Privacy” on the menu.
- Next, Select “Notifications” to view the next page.
- Select “Filters” to filter your notifications, mute notifications from others, and mute certain words.
- Select “Preferences” to adjust the unread notifications count, push notifications, SMS notifications, and email notifications.
Setting your account notifications will allow the platform to inform you according to your preference. One advantage of muting words and alerts from people is that the action will tailor your feeds. You won’t get irrelevant content on your timeline.
How To Adjust Accessibility, Display, and Languages Settings on Twitter
Another major setting on Twitter is for account accessibility. This adjustment allows users to navigate the platform easily. Here, you can adjust auditory, visual, mobility, and cognitive features for disabled users. This includes the screen reader, motion, media, and gestures for easy navigation. In addition, users can adjust their display settings to manage the font size, color, and background. It is also possible to edit the sound settings under this feature.
Additionally, Twitter allows users to change their language. This selection involves display, additional, and other languages you can speak. One extra setting on this list is for data usage. Here, you can adjust video and image qualities, activate data saver, and synchronize your account data. All these settings allow you to customize your feeds and account to your preference.
You can make these adjustments in five steps:
- Navigate to the quick menu on any device.
- Click or tap on the arrow beside “Settings and Support” to view a drop-down menu.
- Select “Settings and Privacy” on the menu.
- Select “Accounts, Display, and Languages” on the next page.
- Select which of the features you wish to adjust.
After this, you will notice the changes on your timeline and other pages.
How To Adjust Security Settings on Twitter
Security settings allow you to manage your security and access options. You can monitor the number of apps connected to your account. This adjustment also allows you to activate two-factor authentication and additional password protection. You can also manage the Google and Apple accounts connected to your account.
To make this adjustment in five simple steps:
- Navigate to “Settings and Privacy” using the steps above.
- Select “Security and Account access” from the options.
- Select “Security” to manage its settings.
- Choose “Apps and Sessions” to view connected apps and account login sessions.
- Select “Connected Accounts” to manage Google and Apple accounts registered and connected to your account login process.
You can choose any option to adjust the Twitter settings according to your preference. You can also activate your password reset protection here. It serves as a two-step verification when resetting your account’s password.
How To Adjust Twitter Privacy Settings: Steps To Keeping Your Account Private
By default, every tweet, photo, or post you share on Twitter is accessible to everyone. Every user on the platform can view your activities even if you are not following each other. Fortunately, a way to control who can view your content is by managing your privacy settings on Twitter.
Here is how to do it in six simple steps:
- Log into your account on a desktop web browser or mobile App.
- On a desktop, open the left side menu by clicking the More option on your homepage. For mobile phone users, tap the circular profile picture on the left.
- Choose the “Settings and Support” option to access a drop-down menu. Then, select “Settings and Privacy” from the menu.
- On the next page display, select “Privacy and Safety,” then “Audience and Tagging” to adjust your privacy.
- Click or tap on the box beside “Protect Your Tweets” to allow only your followers and approved users to see your tweets.
- Next, select the “Photo Tagging” option on the same menu. Then, adjust this to “Only People You Follow Can Tag You.”
Your account and posts are now private; only your selected audience can view them. You can also learn about Twitter privacy settings by selecting the “Learn More” option on this page. You can scroll down the privacy and safety menu for other adjustable options. This includes direct messages, topics, explore features, discoverability, and contact.
How To Adjust Twitter Settings for Sensitive Content: Guides To Unlocking the Moderation Barrier
Twitter may seem like the space to share all your thoughts. However, the platform classifies some content as “Sensitive.” Twitter’s sensitive media policy allows users to review such content. These sensitive contents include graphic content, violent sexual conduct, adult nudity and sexual behavior, bestiality and necrophilia, and gratuitous gore. Without further delays, let’s explore the adjustments for this option.

How To Turn Off Sensitive Content on Twitter
Although the content guideline doesn’t allow inappropriate content to appear on your timeline, you can tweak it. You must understand how to turn off sensitive content on Twitter to disallow them. Once you disallow this content, you will restrict them from your account. The process of adjusting your Twitter settings for sensitive content is straightforward.
Here’s how to do it in five steps:
- Log into your account on the mobile app or desktop web browser.
- Tap on your profile picture or click on More on the desktop.
- Select “Settings and Support,” Then “Settings and Privacy.”
- Choose “Privacy and Safety” and select “Content You See.”
- Uncheck the box beside “Display media that may contain sensitive content.”
Unchecking the sensitive content box finalizes your decision to restrict inappropriate content from your timeline. You can reverse the action by checking the box. These simple steps help you understand how to turn off sensitive content on Twitter.
How To Adjust Twitter Settings To Enable Sensitive Content for Searches
Besides restricting sensitive content on your timeline, the system does the same for searches. Although this fantastic feature removes adult content, you should turn it off. Turning it off enables these contents to appear in your searches.
Here’s how to do it in three steps:
- Log into your account on any device.
- Navigate to “Content You See.”
- Select “Search Settings” and uncheck the box to hide sensitive content.
You have successfully included sensitive content in your Twitter searches.
How To Adjust Twitter Settings To Mark Tweets as Sensitive Content
You may see a sensitive content warning on them whenever you post some content. Twitter can mark and ban your account if you keep doing this. Fortunately, you can adjust your Twitter settings to automatically add a warning to your tweets. The platform allows you to permanently mark your contents as sensitive if all your posts will be of this nature. This way, users will get alerts before viewing your posts.
This is achievable in two steps:
- Navigate to settings and privacy after logging into your account.
- Select “Your Tweets” and check the box beside “Mark media you Tweet as having material that may be sensitive.”
Your posts will automatically have a sensitive content warning to alert other users.

How To Get Your Twitter Archive From Your Settings: Obtaining Your User Data
Under the account settings option, you can get an archive of your data. This data contains essential information about your account since its creation. Accessing your Twitter archive gives you every detail about your data. You only need to navigate to Twitter settings. Then, select the option under your account and enter your password.
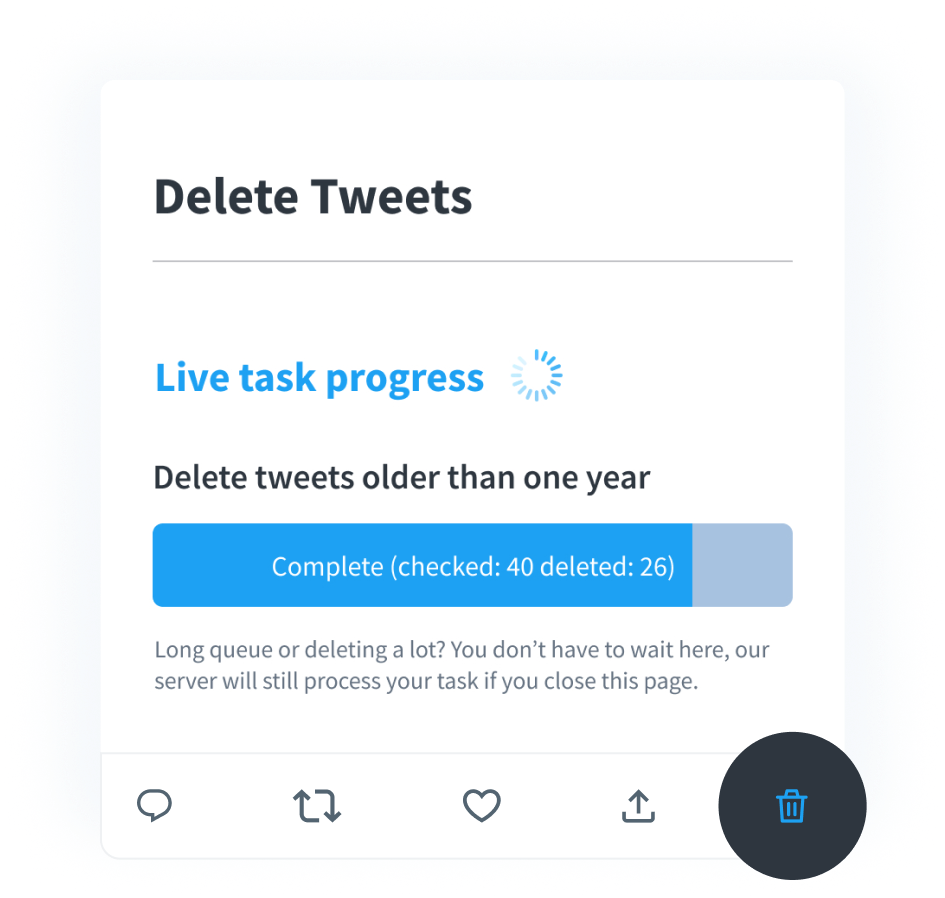
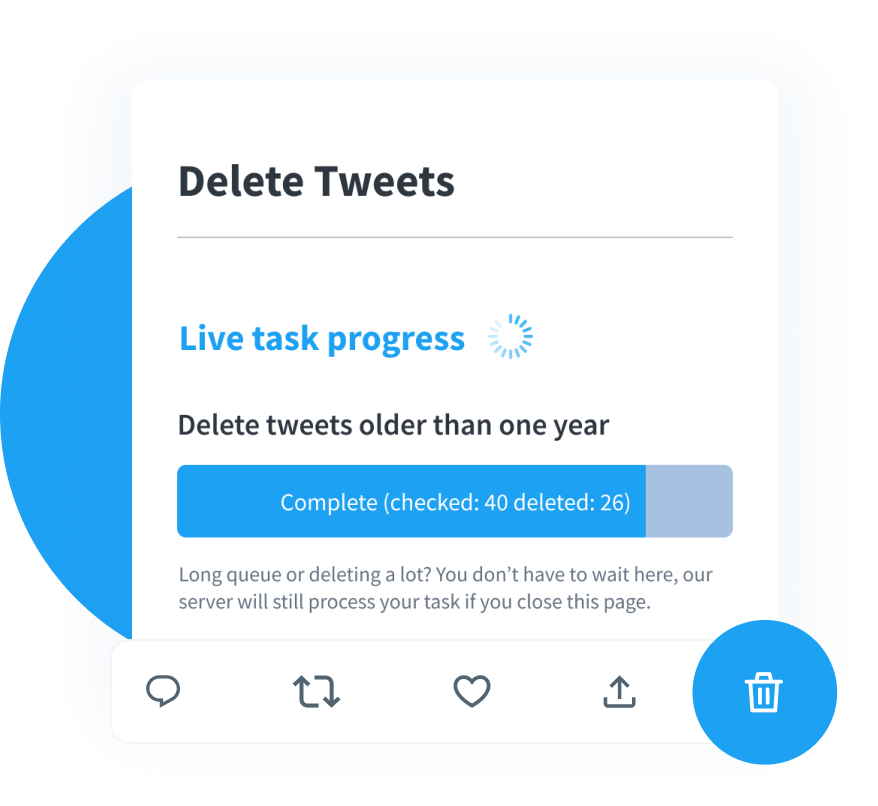
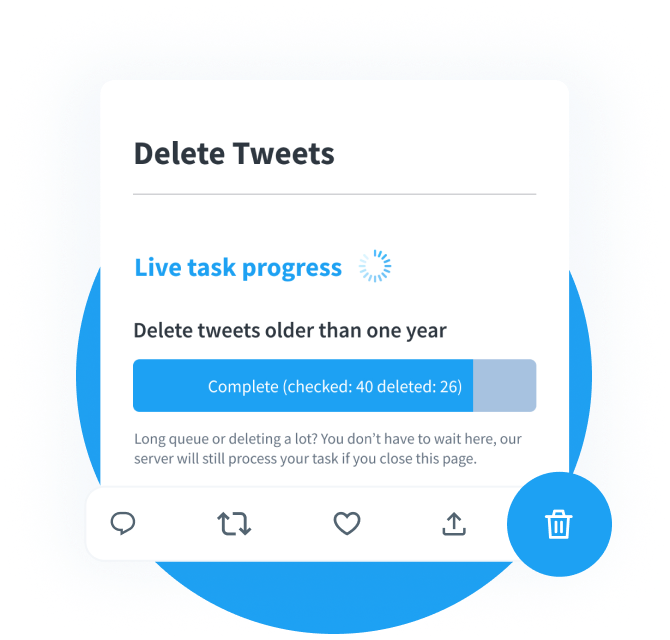
Twitter will send the archive to you in a ZIP file a few hours after requesting a download. One benefit of having your Twitter archive is that you can decide to keep it for future purposes. You can also choose to delete most of your tweets through your archive. Deleting multiple tweets one at a time is time-consuming.
But, at TweetDelete, we have designed an easy-to-use web-based application for filtering and deleting multiple tweets. This tool allows you to load, import, and delete tweets and archives effortlessly. TweetDelete operates without spreading promotional content on your Twitter timeline. Start filtering and cleaning your Twitter timeline today!