Twitter, now X, boasts an exciting and user-friendly interface on the mobile app and the web version. More than other social media platforms, you can personalize your X account settings to enhance privacy and influence visible content. After learning how to change Twitter settings, you can easily personalize your account in appearance and functionality.
There are endless modification possibilities on your Twitter account. Your X settings can help you block off or permit sensitive content on your timeline. You can also make your account private from the settings, allowing only your followers access to your profile and posts. This article will outline how to change settings on Twitter to modify these account functions.

Table of Contents
How To Change Twitter Content Settings: Controlling What You See on X
There are lots of things that make Twitter different from other social media networks. One of the outstanding factors is the level of freedom it affords its users. Anyone can post almost anything on Twitter without restrictions. As a result, there are lots of sensitive content on X.
Luckily, Twitter, by default, sets your account to block sensitive content with a warning message displayed above the content. That includes posts containing violent and immoral content. However, you may seek to change Twitter content settings to remove this message if you’re comfortable with the content. Therefore, this section outlines how to turn sensitive content on or off from the X settings.

How To Change Twitter Settings To See Sensitive Content
By default, Twitter turns off the sensitive content setting for every registered account. However, sensitive content on social media covers a broad spectrum. And Twitter classifies anything that could upset its audience under this category. On X, anything containing nudity, violence, bestiality, necrophilia, or gratuitous gore falls under this category.
Nevertheless, you may find one or more of these categories tolerable. Unfortunately, because this category is broad, you may continuously encounter Twitter’s sensitive content warning. Thus, you may wonder how to change Twitter settings to see sensitive content without recurring sensitive content warnings.
You can do that from your X settings by following these four steps:
- Tap your profile icon in the top left corner of your homepage to reveal the navigation menu.
- From this menu, open the “Settings and Support” option and click “Settings and Privacy.”
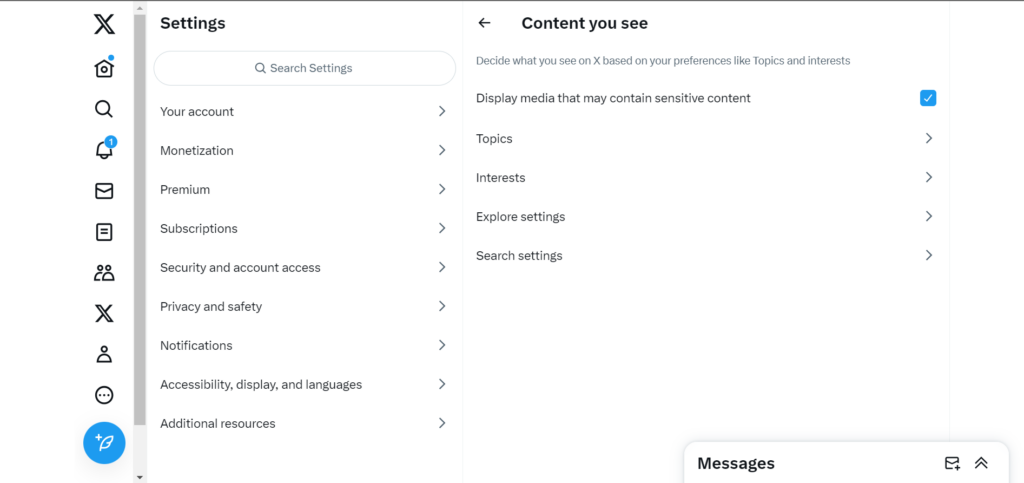
- Select “Privacy and safety” and tap “Content you see.”
- Move the slider on the “Display media that may contain sensitive content” option to turn it on.
This action will allow you to see sensitive content on your X timeline without warning. You can also follow the same steps to turn off this feature and hide sensitive content behind Twitter’s warning.
Unfortunately, you can only change your sensitive content settings on the Android Twitter app or the web version. So, if you browse Twitter from an iPhone, you can’t modify this setting from your mobile application. However, you can log into your X account from any web browser and change your account’s settings for Twitter content. The steps outlined above will also guide you on the X web version.

How To Turn Off Sensitive Content on Twitter Search
The accounts you follow on X determine the content displayed on your timeline. As discussed in the preceding subheading, you can still modify your timeline to show sensitive content. However, this principle and setting does not apply to your Twitter search.
When you search on X, the result exposes you to much more content than found among your contacts. Twitter automatically hides sensitive search results like your timeline content when registering your account. So, you may wonder how to turn off sensitive content on Twitter search to see everything.
Below are the five steps to turn off sensitive search content from your safety settings:
- Open the side menu from your Twitter homepage by tapping your profile icon in the top left corner.
- Click “Settings and Support” and tap “Settings and Privacy.”
- Select “Privacy and safety” from the new page and click “Content you see.”
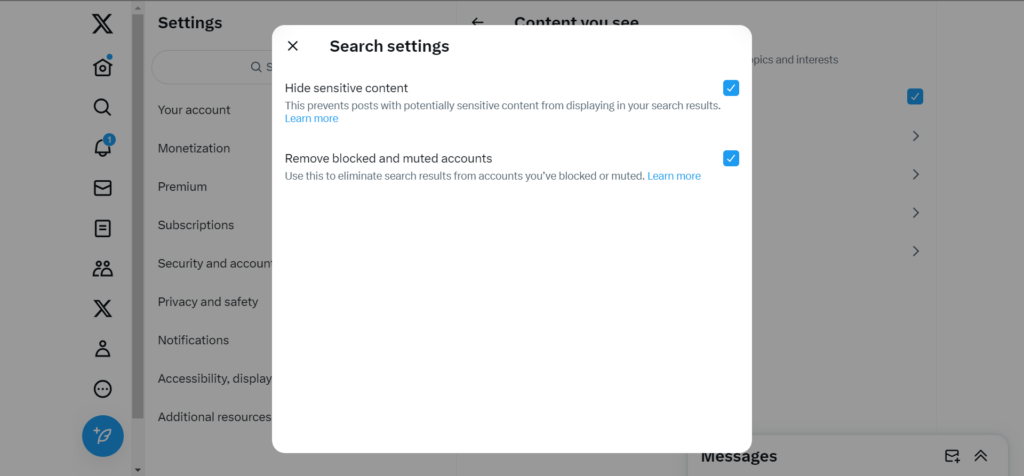
- Once opened, tap “Search settings” at the end of the list.
- Finally, toggle the switch beside the “Hide sensitive content” option to turn it off.
You must have noticed that the sensitive content settings only apply to X media content. How about text? What can you do to hide sensitive content from your timeline and search? Let’s find out.

How To Mute Words on Twitter: Hiding Sensitive Text Content on X
Muting words on your X account is the best way to hide sensitive text content from your timeline ad search. This method is a great way to control your consumption of social media. Once you mute words on X, you won’t see posts or search results containing those words, even if they’re trending!
Here are the five steps to mute a word on Twitter:
- Open Twitter’s navigation menu from your profile picture in the top left corner of your homepage,
- Tap “Settings and Support” and select “Settings and Privacy.”
- Click “Privacy and safety” and tap “Mute and block.”
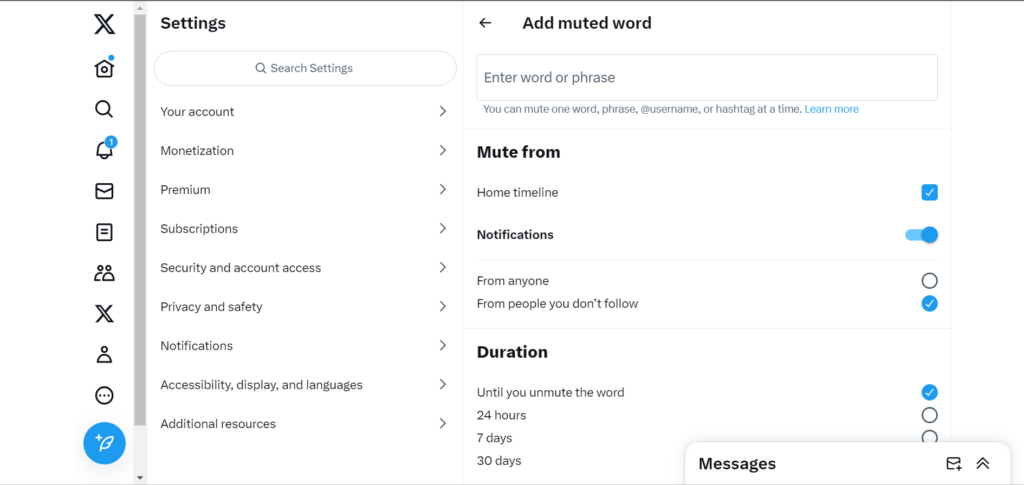
- Choose “Muted words” and tap the plus icon on the bottom right corner to add a new muted word.
- Type the word or phrase in the field above and click “Save” in the top right corner.
You can mute up to 200 words on your account to align your timeline with your preferences.

How To Change Privacy Settings on Twitter
You can’t have “Friends” on X, formerly Twitter. Your X contacts constitute your followers, those you follow, and your Twitter Lists. Unfortunately, Twitter’s transparency permeates from your content to your contacts. That means anybody can follow you and add you to Lists without your permission. Depending on your settings, they can even message you directly!
However, this article section discusses how to change privacy settings on Twitter to help you restrict your account transparency. Only your followers will see your profile and posts when you make your account private on X. In addition, users will require your approval to follow you, and no one can retweet your posts.
If you wish to enjoy these features, here are the four steps to make your X account private:
- Open the Twitter menu from your profile icon in the top left corner of your homepage.
- Tap “Settings and Support” and tap “Settings and Privacy.”
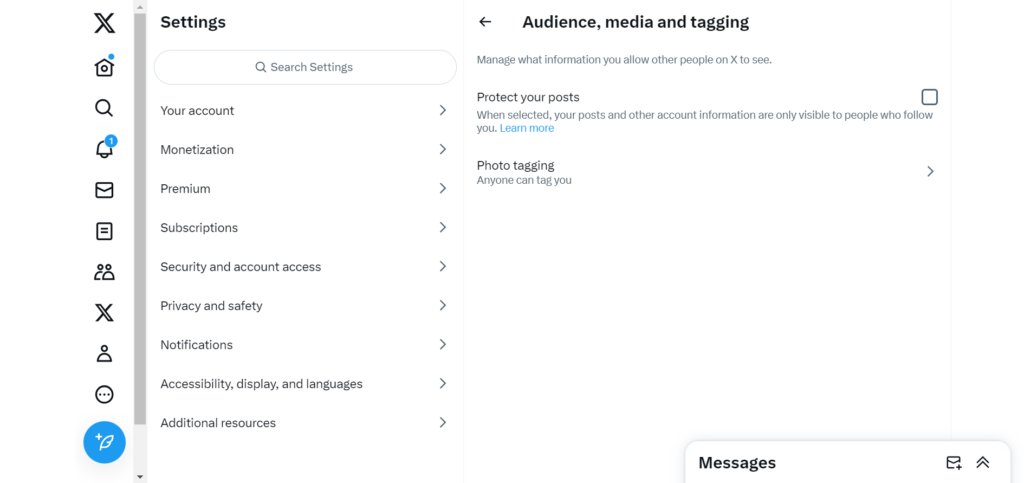
- Click “Privacy and safety” and choose the first option – “Audience and tagging.”
- Move the slider beside the “Protect your posts” option to turn on the privacy feature.
You can always make your account public again by following the same steps. Modifying this feature at will is a perk of learning how to change Twitter settings. However, ensure to clear your timeline or delete posts you’d not like publicly displayed before doing that.
TweetDelete is an excellent Twitter management tool that can help you erase your Twitter timeline with a single click. This web-based tool can automate tweet deletion on your account to ensure you leave no trace if you publish sensitive content. You can also use it to import your tweets and likes in your archive as a backup for your X data. So, check out this tool to start filtering and cleaning your Twitter timeline today!


